activateFileViewerSelectingURLs:
Finderで指定したファイルを選択・表示します。
- (void)activateFileViewerSelectingURLs:(NSArray *)fileURLsfunc activateFileViewerSelectingURLs(_ fileURLs: [AnyObject])
解説
Finderで指定したファイルを選択・表示します。
返り値
なし
引数
ファインダで選択・表示されるファイル
Objective-C(NSArray *)fileURLs(_ fileURLs: [AnyObject])
フレームワーク
ApplicationKit
クラス
NSWorkspace
使用可能
10.6-
更新時のバージョン
OS X 10.10
参照
関連記事(外部サイト)
例文
    //NSWorkspace activateFileViewerSelectingURLs
    @IBAction func function015(sender: AnyObject) {
        //ファイルを選択
        var openPanel = NSOpenPanel()
        openPanel.allowsMultipleSelection = false
        openPanel.canChooseDirectories = false
        openPanel.canCreateDirectories = false
        openPanel.canChooseFiles = true
        openPanel.beginWithCompletionHandler { (result) -> Void in
            //オープンパネルでOKを選択したら
            if result == NSFileHandlingPanelOKButton {
                //選択したファイルを
                let theWorkspace : NSWorkspace = NSWorkspace.sharedWorkspace()
                theWorkspace.activateFileViewerSelectingURLs(openPanel.URLs)
            }//if result
        }//openPanel.beginWithCompletionHandler
    }
launchApplicationAtURL:options:configuration:error:
指定したオプションでアプリケーションを起動します
- (NSRunningApplication *)launchApplicationAtURL:(NSURL *)url options:(NSWorkspaceLaunchOptions)options configuration:(NSDictionary *)configuration error:(NSError **)errorfunc launchApplicationAtURL(_ url: NSURL, options options: NSWorkspaceLaunchOptions, configuration configuration: [NSObject : AnyObject], error error: NSErrorPointer) -> NSRunningApplication?
解説
指定したオプションでアプリケーションを起動します
例えば、32ビットモードで起動・64ビットモードで起動などが出来ます。
OS X 10.10の64ビットマシンで32ビットモードで起動しようとすると下記のようなメッセージが出て起動できません。

現在はX86_64で落ち着いているのであまり必要とされませんが、またプロセッサのアーキテクチャが変更されるときには使うことがあるかもしれません。
返り値
(NSRunningApplication *)NSRunningApplication?
引数
(NSURL *)url_ url: NSURL
(NSWorkspaceLaunchOptions)optionsoptions: NSWorkspaceLaunchOptions
Objective-C
NSString * const NSWorkspaceLaunchConfigurationAppleEvent;
NSString * const NSWorkspaceLaunchConfigurationArguments;
NSString * const NSWorkspaceLaunchConfigurationEnvironment;
NSString * const NSWorkspaceLaunchConfigurationArchitecture;(NSDictionary *)configurationSwift
let NSWorkspaceLaunchConfigurationAppleEvent: NSString!
let NSWorkspaceLaunchConfigurationArguments: NSString!
let NSWorkspaceLaunchConfigurationEnvironment: NSString!
let NSWorkspaceLaunchConfigurationArchitecture: NSString!configuration: [NSObject : AnyObject]
(NSError **)errorerror: NSErrorPointer
フレームワーク
ApplicationKit
クラス
NSWorkspace
使用可能
10.6-
更新時のバージョン
OS X 10.10.3
Swift1.2
関連記事(外部サイト)
例文
    //NSWorkspace launchApplicationAtURL:options:configuration:error:
    @IBAction func function009(sender: AnyObject) {
        let theWorkspace : NSWorkspace = NSWorkspace.sharedWorkspace()
        var anError: NSError?
        let andPrint = NSWorkspaceLaunchOptions.AndPrint.rawValue
        let mask = Int( andPrint ) // cast from UInt

        let theURL : NSURL = NSURL(fileURLWithPath: "/Applications/iTunes.app")!
        let theOption : NSNumber = NSNumber(integer: 0)
        //32ビットモードで起動
        let theArc : NSNumber = NSNumber(integer: NSBundleExecutableArchitectureI386)
        //64ビットモードで起動
        //let theArc : NSNumber = NSNumber(integer: NSBundleExecutableArchitectureX86_64)

        let theConfig : [NSObject : AnyObject] = [NSWorkspaceLaunchConfigurationArchitecture : theArc]
        if (theWorkspace.launchApplicationAtURL(theURL,
                options: NSWorkspaceLaunchOptions.Async,
                configuration: theConfig,
                error: &anError) != nil){
            NSLog("YES")
        }else{
            NSLog("NO")
        }


    }
NSScreenクラス
スクリーンオブジェクト
| 継承 | NSObject |
| 準拠 | NSObject (NSObject) |
| フレームワーク | /System/Library/Frameworks/AppKit.framework |
| 使用可能 | OS X 10.0以降 |
| 定義 | |
| インポート文 | @import AppKit; |
概要
スクリーンを表すオブジェクトです。


メソッドとプロパティ
NSScreenオブジェクトを取得
main
メインスクリーンを返します 10.0-
deepest
最もたくさんの色が表示できるスクリーンを返します 10.0-
screens
利用可能なスクリーンの配列を返します 10.0-
スクリーン情報を取得
depth
スクリーンの色深度を返します 10.0-
frame
スクリーン全体のフレームを返します 10.0-
supportedWindowDepths
スクリーンでサポートされる色深度を返します
deviceDescription
スクリーンのデバイス辞書を返します 10.0-
visibleFrame
メニューバーとドックを除いたスクリーン領域を返します 10.0-
colorSpace
カラースペースを返します 10.6-
screensHaveSeparateSpaces
スクリーンそれぞれに独立した色空間を持つかどうかを返します 10.9-
canRepresent
ガモットマッピング可能かを返します。 10.12-
スクリーンの背景となる座標変換
backingAlignedRect:options:
スクリーンにしたがって整理された矩形を返します 10.7-
backingScaleFactor
スクリーンの倍率を返します10.7-
convertRectFromBacking:
デバイスピクセルとディスプレイの座標システムとの変換 10.7-
convertRectToBacking:
矩形をスクリーンのデバイスピクセルの整理して返します 10.7-
maximumExtendedDynamicRangeColorComponentValue
拡張ダイナミックレンジ(EDR)値 10.11-
通知
NSScreenColorSpaceDidChangeNotification
スクリーンのカラースペースが変更された時の通知 10.6-
非推奨となったメソッド
userSpaceScaleFactor
スクリーンの解像度を返します。 10.4-10.7
定数
なし
参照
関連記事(外部サイト)
更新時バージョン
10.10.3
Swift1.2
NSControlクラス
コントローラーのクラス。ボタンなどコントロール部品のベースクラスとなります。
| 継承 | NSObject |
| NSResponder | |
| NSView | |
| 準拠 | NSObject (NSObject) |
| フレームワーク | /System/Library/Frameworks/AppKit.framework |
| 使用可能 | OS X 10.0以降 |
| 定義 | |
| インポート文 | @import AppKit; |
概要
コントローラーのクラス。ボタンなどコントロール部品のベースクラスとなります。
メソッドとプロパティ
NSControlの初期化
initWithFrame: (指定イニシャライザ)
init(frame)
コントロールを初期化して返します
コントロールセルの設定
cellClass(OS X v10.10で非推奨)
setCellClass: (OS X v10.10で非推奨)
cell(OS X v10.10で非推奨)
setCell: (OS X v10.10で非推奨)
Identifying the Selected Cell
selectedCell(OS X v10.10で非推奨)
selectedTag(OS X v10.10で非推奨)
コントロール値の取得と設定
doubleValue
倍精度浮動小数点数値としてコントロールの値を設定
setDoubleValue:
→doubleValueを使用
floatValue
シングルの浮動小数点数値を返します
setFloatValue:
→floatValueを使用します
intValue
コントロールの整数値
setIntValue: →integerValue
integerValue
コントロールの整数値
setIntegerValue:
→
objectValue
コントロールのオブジェクト
setObjectValue:
→objectValueを使用します。
stringValue
→
setStringValue:
setNeedsDisplay
(OS X v10.10で非推奨)
attributedStringValue
setAttributedStringValue:
→
他のコントロールと連動
takeDoubleValueFrom:
takeFloatValueFrom:
takeIntValueFrom:
takeIntegerValueFrom:
takeObjectValueFrom:
takeStringValueFrom:
テキストのフォーマット
alignment
setAlignment:
font
setFont:
setFloatingPointFormat:left:right:
(OS X v10.10で非推奨)
formatter
setFormatter:
baseWritingDirection
setBaseWritingDirection:
フィールドエディタの管理
セルの表示
selectCell:
(OS X v10.10で非推奨)
drawCell:
(OS X v10.10で非推奨)
drawCellInside:
(OS X v10.10で非推奨)
updateCell:
(OS X v10.10で非推奨)
updateCellInside:
(OS X v10.10で非推奨)
ターゲットアクションメカニズムの実装
action
setAction:
target
setTarget:
isContinuous
Available in OS X v10.0 through OS X v10.9
setContinuous:
sendAction:to:
sendActionOn:
ユーザーインターフェースレイアウト方向の管理
userInterfaceLayoutDirection
(OS X v10.8 -10.9)
setUserInterfaceLayoutDirection:
(OS X v10.8 -10.9)
制約ベースレイアウトのサポート
定数
参照
関連記事(外部サイト)
更新時バージョン
更新時のバージョン
OS X 10.10.3
Swift1.0
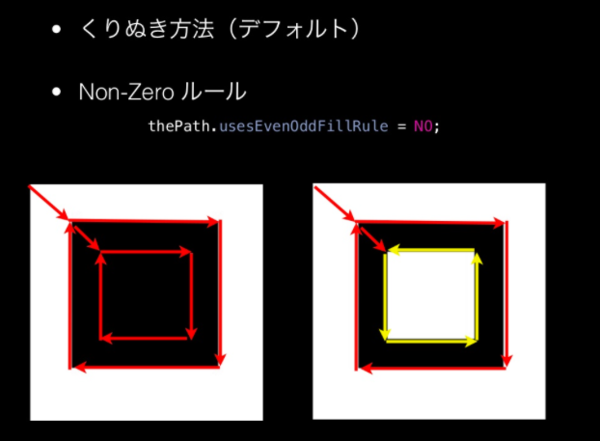
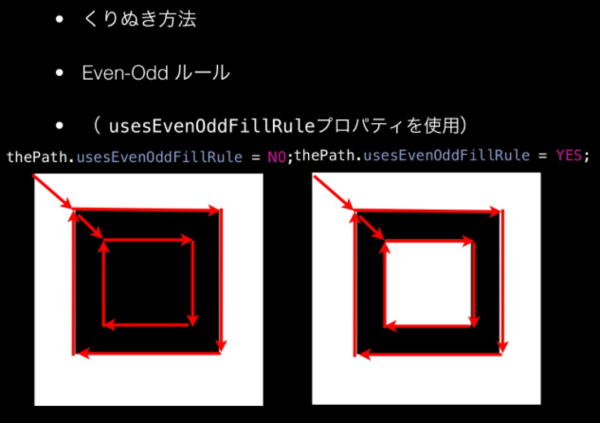
NSWindingRule
重なった場合のくりぬき規則
typedef enum { NSNonZeroWindingRule = 0, NSEvenOddWindingRule = 1 } NSWindingRule;enum NSWindingRule : UInt { case NonZeroWindingRule case EvenOddWindingRule }
解説


設定値
Objective-C
NSNonZeroWindingRule
同じ向きだとくり抜かれる
NSEvenOddWindingRule
重なり回数でくり抜かれるSwift
NonZeroWindingRule
同じ向きだとくり抜かれる
EvenOddWindingRule
重なり回数でくり抜かれる
フレームワーク
ApplicationKit
クラス
NSBezier
使用可能
10.0
更新時のバージョン
OS X 10.10
参照
関連記事(外部サイト)
例文
    //NSBezierPath defaultWindingRule
    //NSBezierPath setDefaultWindingRule
    var aButton021 : NSButton?
    var aView021 : NSView?
    //実験用ビューのボタンを押した時に実行されるところ
    func viewAction021(sender : AnyObject?){
        //準備
        let aButton = aButton021
        let aView   = aView021
        var theWindow : NSWindow = aButton!.window!
        //準備ここまで

        //ビューにフォーカスを当てる
        aView?.lockFocus()
        //バックグラウンドカラーを描画
        let backgroundColor = NSColor.whiteColor()
        backgroundColor.setFill()
        NSRectFill(NSMakeRect(0, 20, 300.0, 178.0))

        NSColor.redColor().setStroke()
        NSColor.magentaColor().setFill()
        //空のベジェパスを作成
        let aBezier : NSBezierPath = NSBezierPath()
        aBezier.moveToPoint(CGPoint(x: 176.95,y: 44.90))
        aBezier.curveToPoint(CGPoint(x: 166.71,y: 145.89),
            controlPoint1: CGPoint(x: 76.63,y: 76.78),
            controlPoint2: CGPoint(x: 82.59,y: 206.70))
        aBezier.curveToPoint(CGPoint(x: 176.95,y: 44.90),
            controlPoint1: CGPoint(x: 237.55,y: 224.76),
            controlPoint2: CGPoint(x: 276.83,y: 95.98))
        aBezier.closePath()
        aBezier.fill()
        aBezier.lineWidth = 2.0
        aBezier.stroke()

        switch (NSBezierPath.defaultWindingRule() ){
        case .EvenOddWindingRule:
            NSLog("defaultWindingRule EvenOdd")
        case .NonZeroWindingRule:
            NSLog("defaultWindingRule Non Zero")
        default:
            NSLog("default")
        }
        //->defaultWindingRule Non Zero

        NSBezierPath.setDefaultWindingRule( .EvenOddWindingRule)
        switch (NSBezierPath.defaultWindingRule() ){
        case .EvenOddWindingRule:
            NSLog("defaultWindingRule EvenOdd")
        case .NonZeroWindingRule:
            NSLog("defaultWindingRule Non Zero")
        default:
            NSLog("default")
        }
        //->defaultWindingRule EvenOdd


        //ビューからフォーカスを外す
        aView?.unlockFocus()
        //NSLog("!!! %@",aBezier.description)
    }
    @IBAction func function021(sender: AnyObject) {
        var aWindow : NSWindow
        = NSWindow(contentRect: NSMakeRect(0.0, 0.0, 300.0, 200.0),
            styleMask: NSTitledWindowMask
                | NSClosableWindowMask
                | NSMiniaturizableWindowMask
                | NSResizableWindowMask,
            backing: .Buffered,
            defer: false,
            screen: NSScreen.mainScreen())
        windowArray.addObject(aWindow) //ウインドウを保持するための配列に追加。アプリ終了時に配列は破棄
        aWindow.center()//ウインドウをスクリーンの中心に
        aWindow.title = "NSBezierPath"//タイトル設定
        //ボタン
        var theButton : NSButton = NSButton(frame: NSMakeRect(100.0, 0.0, 100.0, 30.0))
        theButton.title = "Action"
        theButton.bezelStyle = NSBezelStyle.RoundedBezelStyle
        theButton.action = Selector("viewAction021:")
        theButton.target = self

        aWindow.contentView.addSubview(theButton)
        //ビュー
        var theView : NSView = NSView(frame: NSMakeRect(0.0, 20.0, 300.0, 100.0))
        //レイヤーバックドにするのだ
        theView.wantsLayer = true
        aWindow.contentView.addSubview(theView)

        //実験ウインドウにUIパーツを渡す
        self.aButton021 = theButton    //ボタン
        self.aView021 = theView        //テストビュー
        aWindow.orderFront(self)//前面に
        aWindow.makeKeyAndOrderFront(self)//表示
    }
NSLineCapStyle
線の端の形状
typedef enum {
   NSButtLineCapStyle   = 0,
   NSRoundLineCapStyle  = 1,
   NSSquareLineCapStyle = 2
} NSLineCapStyle;
enum NSLineCapStyle : UInt {
    case ButtLineCapStyle
    case RoundLineCapStyle
    case SquareLineCapStyle
}
解説
● NSButtLineCapStyle すぱっと切れた端
ButtLineCapStyle

● NSRoundLineCapStyle 丸い端
RoundLineCapStyle

● NSSquareLineCapStyle 四角い端
SquareLineCapStyle

フレームワーク
ApplicationKit
クラス
NSBezier
使用可能
10.0
更新時のバージョン
OS X 10.10
参照
関連記事(外部サイト)
例文
//NSBezierPath
    var aButton023 : NSButton?
    var aView023 : NSView?
    //実験用ビューのボタンを押した時に実行されるところ
    func viewAction023(sender : AnyObject?){
        //準備
        let aButton = aButton023
        let aView   = aView023
        var theWindow : NSWindow = aButton!.window!
        //準備ここまで

        //ビューにフォーカスを当てる
        aView?.lockFocus()
        //バックグラウンドカラーを描画
        let backgroundColor = NSColor.whiteColor()
        backgroundColor.setFill()
        NSRectFill(NSMakeRect(0, 20, 300.0, 178.0))

        //ここ
        //NSBezierPath.setDefaultLineCapStyle(.ButtLineCapStyle)
        //NSBezierPath.setDefaultLineCapStyle(.RoundLineCapStyle)
        NSBezierPath.setDefaultLineCapStyle(.SquareLineCapStyle)
        NSColor.magentaColor().setStroke()
        //空のベジェパスを作成
        let aBezier : NSBezierPath = NSBezierPath()
        aBezier.moveToPoint(CGPoint(x: 95.00,y: 45.00))
        //線を引く
        aBezier.lineToPoint(CGPoint(x: 185.00,y: 60.00))
        aBezier.lineToPoint(CGPoint(x: 130.00,y: 150.00))

        aBezier.lineWidth = 40.0
        aBezier.stroke()

        //ガイド
        aBezier.appendBezierPathWithOvalInRect(NSMakeRect(130-30.0, 150.0-30.0, 60.0, 60.0))
        aBezier.lineWidth = 2.0
        NSColor.redColor().setStroke()
        aBezier.stroke()
        //ビューからフォーカスを外す
        aView?.unlockFocus()
        NSLog("!!! %@",aBezier.description)
    }
    //実験用ウインドウ作成、実験用ビュー、実行ボタンを作成してウインドウに貼り付けるところまで
    @IBAction func function023(sender: AnyObject) {
        var aWindow : NSWindow
        = NSWindow(contentRect: NSMakeRect(0.0, 0.0, 300.0, 200.0),
            styleMask: NSTitledWindowMask
                | NSClosableWindowMask
                | NSMiniaturizableWindowMask
                | NSResizableWindowMask,
            backing: .Buffered,
            defer: false,
            screen: NSScreen.mainScreen())
        windowArray.addObject(aWindow) //ウインドウを保持するための配列に追加。アプリ終了時に配列は破棄
        aWindow.center()//ウインドウをスクリーンの中心に
        aWindow.title = "NSBezierPath"//タイトル設定
        //ボタン
        var theButton : NSButton = NSButton(frame: NSMakeRect(100.0, 0.0, 100.0, 30.0))
        theButton.title = "Action"
        theButton.bezelStyle = NSBezelStyle.RoundedBezelStyle
        theButton.action = Selector("viewAction023:")
        theButton.target = self

        aWindow.contentView.addSubview(theButton)
        //ビュー
        var theView : NSView = NSView(frame: NSMakeRect(0.0, 20.0, 300.0, 100.0))
        //レイヤーバックドにするのだ
        theView.wantsLayer = true
        aWindow.contentView.addSubview(theView)

        //実験ウインドウにUIパーツを渡す
        self.aButton023 = theButton    //ボタン
        self.aView023 = theView        //テストビュー
        aWindow.orderFront(self)//前面に
        aWindow.makeKeyAndOrderFront(self)//表示

    }
NSLineJoinStyle
接続点の形状
typedef enum {
   NSMiterLineJoinStyle = 0,
   NSRoundLineJoinStyle = 1,
   NSBevelLineJoinStyle = 2
} NSLineJoinStyle;
enum NSLineJoinStyle : UInt {
    case MiterLineJoinStyle
    case RoundLineJoinStyle
    case BevelLineJoinStyle
}
解説
● NSBevelLineJoinStyle 角張った角
BevelLineJoinStyle

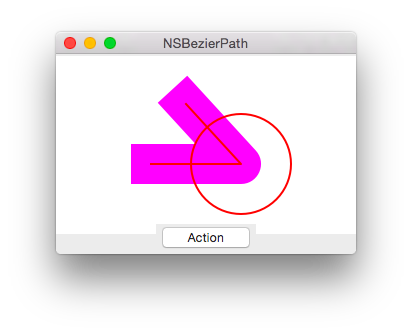
● NSMiterLineJoinStyle とんがった角
MiterLineJoinStyle

● NSRoundLineJoinStyle 丸い角
RoundLineJoinStyle

フレームワーク
ApplicationKit
クラス
NSBezier
使用可能
10.0
更新時のバージョン
OS X 10.10
参照
関連記事(外部サイト)
例文
    //NSBezierPath setDefaultLineJoinStyle
    var aButton026 : NSButton?
    var aView026 : NSView?
    //実験用ビューのボタンを押した時に実行されるところ
    func viewAction026(sender : AnyObject?){
        //準備
        let aButton = aButton026
        let aView   = aView026
        var theWindow : NSWindow = aButton!.window!
        //準備ここまで

        //ビューにフォーカスを当てる
        aView?.lockFocus()
        //バックグラウンドカラーを描画
        let backgroundColor = NSColor.whiteColor()
        backgroundColor.setFill()
        NSRectFill(NSMakeRect(0, 20, 300.0, 178.0))


        //NSBezierPath.setDefaultLineCapStyle(.ButtLineCapStyle)
        //NSBezierPath.setDefaultLineCapStyle(.RoundLineCapStyle)
        NSBezierPath.setDefaultLineCapStyle(.SquareLineCapStyle)

        //ここ
        NSBezierPath.setDefaultLineJoinStyle( .MiterLineJoinStyle)
        //NSBezierPath.setDefaultLineJoinStyle( .RoundLineJoinStyle)
        //NSBezierPath.setDefaultLineJoinStyle( .BevelLineJoinStyle)

        NSColor.magentaColor().setStroke()
        //空のベジェパスを作成
        let aBezier : NSBezierPath = NSBezierPath()
        aBezier.moveToPoint(CGPoint(x: 95.00,y: 90.00))
        //線を引く
        aBezier.lineToPoint(CGPoint(x: 185.00,y: 90.00))
        aBezier.lineToPoint(CGPoint(x: 130.00,y: 150.00))

        //SquareLineCapStyleで描画
        aBezier.lineWidth = 40.0
        aBezier.stroke()


        //ガイド
        aBezier.appendBezierPathWithOvalInRect(NSMakeRect(185-50.0, 90.0-50.0, 100.0, 100.0))
        aBezier.lineWidth = 2.0
        NSColor.redColor().setStroke()
        aBezier.stroke()
        //ビューからフォーカスを外す
        aView?.unlockFocus()

        switch (NSBezierPath.defaultLineJoinStyle() ){
        case .MiterLineJoinStyle:
            NSLog("MiterLineJoinStyle")
        case .RoundLineJoinStyle:
            NSLog("RoundLineJoinStyle")
        case .BevelLineJoinStyle:
            NSLog("BevelLineJoinStyle")
        default:
            NSLog("default")
        }

        NSLog("!!! %@",aBezier.description)
    }
    //実験用ウインドウ作成、実験用ビュー、実行ボタンを作成してウインドウに貼り付けるところまで
    @IBAction func function026(sender: AnyObject) {
        var aWindow : NSWindow
        = NSWindow(contentRect: NSMakeRect(0.0, 0.0, 300.0, 200.0),
            styleMask: NSTitledWindowMask
                | NSClosableWindowMask
                | NSMiniaturizableWindowMask
                | NSResizableWindowMask,
            backing: .Buffered,
            defer: false,
            screen: NSScreen.mainScreen())
        windowArray.addObject(aWindow) //ウインドウを保持するための配列に追加。アプリ終了時に配列は破棄
        aWindow.center()//ウインドウをスクリーンの中心に
        aWindow.title = "NSBezierPath"//タイトル設定
        //ボタン
        var theButton : NSButton = NSButton(frame: NSMakeRect(100.0, 0.0, 100.0, 30.0))
        theButton.title = "Action"
        theButton.bezelStyle = NSBezelStyle.RoundedBezelStyle
        theButton.action = Selector("viewAction026:")
        theButton.target = self

        aWindow.contentView.addSubview(theButton)
        //ビュー
        var theView : NSView = NSView(frame: NSMakeRect(0.0, 20.0, 300.0, 100.0))
        //レイヤーバックドにするのだ
        theView.wantsLayer = true
        aWindow.contentView.addSubview(theView)

        //実験ウインドウにUIパーツを渡す
        self.aButton026 = theButton    //ボタン
        self.aView026 = theView        //テストビュー
        aWindow.orderFront(self)//前面に
        aWindow.makeKeyAndOrderFront(self)//表示
    }